For a number of years VMware has been using an internal tool to help customers diagnose problems with virtual machines. The tool, named vmss2core, became publically available with the release of VMware Workstation 7.0.
The biggest difference between vmss2core and other debugging solutions is that it requires absolutely no modifications in the virtual machine. No Windows registry keys to change, no Linux kernel modules to configure and no additional software to be installed.
This turned out to be very helpful, as most of production VMs run with no debugging tools enabled. When Windows throws a BSOD, or Linux kernel panics, or either of them hang, there is very little information that can be obtained. True, both Windows and Linux provide extensive debugging tools, but they are frequently cumbersome to setup, consume VM resources and/or pose security threats.
The vmss2core avoids these drawbacks by building on the checkpoint infrastructure in VMware products. If you create a checkpoint of VM or suspend it when problem occurs, the resulting checkpoint files have all the information that debuggers need. All we needed was a utility that converts VMware formats into something that 3rd party debuggers understand. This is precisely what vmss2core does.
Although vmss2core ships with Workstation 7, it is capable of analyzing checkpoints and suspended VMs created by many of VMware earlier products. It works with both with desktop products , e.g. Workstation, and ESX. All you need to do is to create a checkpoint or suspend a VM, then copy out files corresponding to checkpoint to Linux and Windows Host, and run vmss2core with option specifying what output you want to get.
Presently, vmss2core can produce windbg-compatible .dmp file for Windows VMs (-Wxxx), RedHat crash-compatible core files (-Nxxx), MacOS VM formats (-Xxxx), as well as “flat address space view” (no options) and “physical memory view” (-M) formats suitable for analysis with gdb. The utility prints out details for these options when you run it without arguments.
The utility has to guess kernel build numbers and location of debugging-related data structures. Different options control the guessing algorithms. For crash-compatible output, you can either specify linux family using -N4 or -N6 options, or use combination of -N and -l. The argument for -l is generated using the same script as used by built-in debugger. For Windows VM, using "-W" works most of the time. If windbg is not completely happy with the resulting file, you may want to supply more information, e.g. build number with -Wnum, or location of debug block using -WDDB.
The tool uses only part of the checkpoint as an input. For ESX products, that would be .vmss file. For desktop products, it needs a pair of files: .vmss or .vmsn file with virtual device information, and .vmem file with memory image. The vm-script on ESX has an option that will suspend a VM and package .vmss file into the support archive.
What else is this tool good for? Forensics. Since nothing is tweaked in the VM , there is no way to detect from inside VM that analysis is performed. I hope this makes vmss2core an interesting tool for anti-virus/malware/worms community, especially combined with honeypots built using VMware VMs.
The vmss2core may also be of interest to virtual appliance providers. Instead of building remote debugging capabilities, they can request a compressed checkpoint of the VM to be sent to them for analysis.
I am really happy that VMware released this tool, and I hope the customers will find it useful. You can download Workstation 7 with vmss2core here. Please feel free to ask about the tool on VMware forums. Please note that utility may not be officially supported by VMware.
Sunday, January 31, 2010
Wednesday, September 3, 2008
Replay Debugging works with Windows
I have not been posting for quite some time. Replay Debugging team in VMware was busy with new feature of VMware Workstation 6.5: Replay Debugging of Windows applications.
What we did was integrating Visual Studio plugin for Workstation with Record/Replay technology. You can now develop your application with Visual Studio, and then with a few mouse clicks launch it in a VM in recording mode. You can then replay recording as many times as you want, using all the debugging facilities Visual Studio provides.
But we did not stop at that. We also implemented unique "reverse execution" feature. Say, if you are debugging a memory corruption, you can put watchpoint on corrupted memory and then hit "Reverse Continue" in Visual Studio plugin menu - and we'll navigate the recording right to the place where memory was last written to.
My colleague E Lewis put a lot more information about Replay Debugging for Windows at the the appropriately named www.replaydebugging.com. There are howtos, tips, tricks and even video presentations showing the feature there.
If you have not already, you can grab latest Workstation build here. Please post your comments, suggestions, bug reports in our forum. Have fun!
Tuesday, October 16, 2007
Configuring application debugging with Record/Replay
In my previous article I explained how to debug processes running in Ubuntu 7.04 VM using Record/Replay technology built into VMware Workstation 6.0.1. This article tells how to use Record/Replay debugging with different distributions of Linux.
When debugging an application using Record/Replay, you need to run the debugger on the Host (outside of Virtual Machine). The reason for this is obvious - if the debugger runs inside the Virtual Machine, it will disturb the execution of the VM and you will not get 100% determinism. The downside of running the debugger outside of the VM is that it cannot use kernel services to debug processes.
We solved this problem by teaching our debugger how to implement process-level debugging by traversing Linux kernel data structures. Since the Linux kernel is evolving rapidly, the format of these data structures changes quite frequently. This is why we require users to tell us the offsets of some kernel data structures with the "monitor linuxoffsets" command. Here is example of this command for Ubuntu 7.04:
(gdb) monitor linuxoffsets 0x20614,0x80,0,0x68,0x194,0xa4,0x1b0, \ 0x24,0x18,0x28,0x2000,0xc4,0xec,0x10
This line may look cryptic, but its semantics are quite simple. You can see its format by issuing the following command in gdb:
(gdb) monitor help linuxoffsets
Informs debug stub about offsets in Linux kernel. Offsets have to be
set before other monitor commands are used. The format is:
monitor linuxoffsets [-l] <version>,<mm>,<next_task>,<tasks>, \
<comm>,<pid>,<thread>,<pgd>,<rsp0/esp0>,<fs>,<threadsize>,\
<grouplead>,<threadgroup>,<commsize>
where each field except version, pgd, fs, threadsize and commsize
are hexadecimal offsets of the field in task_struct, pgd is offset
in mm_struct, rsp0/esp0 and fs are offsets in
thread_struct, version is kernel version and threadsize is
THREAD_SIZE. If some field does not exist, use 0. For example:
monitor linuxoffsets 0x20407,0x2c,0x48,0,0x236,0x6c,0x260,0xc,0 \
0xc,0x2000,0x0,0x0,0x10
You may use getlinuxoffsets and getlinuxoffset.gdb scripts to
obtain offsets from kernel with symbols or kernel source tree.
The output mentions two little scripts that can automatically compute the offsets line for you. The first one can be used if you have a Linux kernel compiled with symbols, and the second one works with a Linux source tree. Here is the the first script:
------- cut here: getlinuxoffsets.gdb ------------
------- cut here ---------------------------------
You should set LINUXVERSION to the correct Linux version. Invoke the script this way (vmlinux.dbg is kernel with symbols):
% gdb --quiet --command getlinuxoffsets.gdb vmlinux.dbg
For example, if you are dealing with uniprocessor RHEL4 AS Update 3, this sequence of steps will get you the offsets line:
# Replace LINUXVERSION with 0x020609 in getlinuxoffsets.gdb
% rpm2cpio kernel-debuginfo-2.6.9-34.EL.i686.rpm | cpio -i --make-directories
% gdb --quiet --command getlinuxoffsets.gdb \
usr/lib/debug/lib/modules/2.6.9-34.EL/vmlinux
0x20609,0x70,0x0,0x58,0x246,0x94,0x270,0x20,0x1c,0x2c,0x1000,0x0,0x0,0x10
That's it, you can feed this line to "monitor linuxoffsets".
Not all distributions come with kernels with symbols, however. The alternative way of obtaining the offsets line is to use a second script together with the source tree of the kernel. It actually consists of three files
------- cut here: getlinuxoffsets ----------------
--------------------------------------------------
------- cut here: getlinuxoffsets1.c -------------
--------------------------------------------------
------- cut here: getlinuxoffsets2.c -------------
--------------------------------------------------
Invoke the getlinuxoffsets script as follows (provide the path to the kernel source tree if it is not /usr/src/linux):
% chmod u+x getlinuxoffsets
% ./getlinuxoffsets
0x20609,0xc0,0,0x90,0x422,0xf4,0x450,0x38,0,0x18,0x2000,0,0,0x10
Note that these scripts and Record/Replay feature in the WS6.0.1 are not officially supported by VMware. If you have questions or suggestions, the best place to express them is our forum. Thank you.
When debugging an application using Record/Replay, you need to run the debugger on the Host (outside of Virtual Machine). The reason for this is obvious - if the debugger runs inside the Virtual Machine, it will disturb the execution of the VM and you will not get 100% determinism. The downside of running the debugger outside of the VM is that it cannot use kernel services to debug processes.
We solved this problem by teaching our debugger how to implement process-level debugging by traversing Linux kernel data structures. Since the Linux kernel is evolving rapidly, the format of these data structures changes quite frequently. This is why we require users to tell us the offsets of some kernel data structures with the "monitor linuxoffsets" command. Here is example of this command for Ubuntu 7.04:
(gdb) monitor linuxoffsets 0x20614,0x80,0,0x68,0x194,0xa4,0x1b0, \ 0x24,0x18,0x28,0x2000,0xc4,0xec,0x10
This line may look cryptic, but its semantics are quite simple. You can see its format by issuing the following command in gdb:
(gdb) monitor help linuxoffsets
Informs debug stub about offsets in Linux kernel. Offsets have to be
set before other monitor commands are used. The format is:
monitor linuxoffsets [-l] <version>,<mm>,<next_task>,<tasks>, \
<comm>,<pid>,<thread>,<pgd>,<rsp0/esp0>,<fs>,<threadsize>,\
<grouplead>,<threadgroup>,<commsize>
where each field except version, pgd, fs, threadsize and commsize
are hexadecimal offsets of the field in task_struct, pgd is offset
in mm_struct, rsp0/esp0 and fs are offsets in
thread_struct, version is kernel version and threadsize is
THREAD_SIZE. If some field does not exist, use 0. For example:
monitor linuxoffsets 0x20407,0x2c,0x48,0,0x236,0x6c,0x260,0xc,0 \
0xc,0x2000,0x0,0x0,0x10
You may use getlinuxoffsets and getlinuxoffset.gdb scripts to
obtain offsets from kernel with symbols or kernel source tree.
The output mentions two little scripts that can automatically compute the offsets line for you. The first one can be used if you have a Linux kernel compiled with symbols, and the second one works with a Linux source tree. Here is the the first script:
------- cut here: getlinuxoffsets.gdb ------------
# Copyright 2007 VMware, Inc.  All rights reserved.
set $linuxVersion=LINUXVERSION
if (uint32_t)0
end
define OFFS
   printf "0x%x,", ((unsigned)&((struct $arg0 *) 0)->$arg1)
end
OFFS task_struct mm
if $linuxVersion < 0x020415
   OFFS task_struct next_task
   printf "0x0,"
else
   printf "0x0,"
   OFFS task_struct tasks
end
OFFS task_struct comm
OFFS task_struct pid
OFFS task_struct thread
OFFS mm_struct  pgd
if sizeof(void *) == 0x8
   OFFS thread_struct rsp0
else
   OFFS thread_struct esp0
end
OFFS thread_struct fs
if $linuxVersion < 0x020600
   printf "0x2000,"
else
   printf "0x%x,", sizeof ((union thread_union *)0)->stack
end
if $linuxVersion < 0x020611
   printf "0x0,0x0,"
else
   OFFS task_struct group_leader
   OFFS task_struct thread_group
end
printf "0x%x\n", sizeof ((struct task_struct *)0)->comm
quit
------- cut here ---------------------------------
You should set LINUXVERSION to the correct Linux version. Invoke the script this way (vmlinux.dbg is kernel with symbols):
% gdb --quiet --command getlinuxoffsets.gdb vmlinux.dbg
For example, if you are dealing with uniprocessor RHEL4 AS Update 3, this sequence of steps will get you the offsets line:
# Replace LINUXVERSION with 0x020609 in getlinuxoffsets.gdb
% rpm2cpio kernel-debuginfo-2.6.9-34.EL.i686.rpm | cpio -i --make-directories
% gdb --quiet --command getlinuxoffsets.gdb \
usr/lib/debug/lib/modules/2.6.9-34.EL/vmlinux
0x20609,0x70,0x0,0x58,0x246,0x94,0x270,0x20,0x1c,0x2c,0x1000,0x0,0x0,0x10
That's it, you can feed this line to "monitor linuxoffsets".
Not all distributions come with kernels with symbols, however. The alternative way of obtaining the offsets line is to use a second script together with the source tree of the kernel. It actually consists of three files
------- cut here: getlinuxoffsets ----------------
#!/bin/bash
# Copyright 2007 VMware, Inc.  All rights reserved.
if [ "$CC" == "" ]; then
   CC=gcc
fi
if [ "$1" == "" ]; then
   INCLUDE_PATH=/usr/src/linux/include
else
   INCLUDE_PATH="$1/include"
fi
$CC -c -I "$INCLUDE_PATH" -I "$INCLUDE_PATH"/asm/mach-default \
   getlinuxoffsets2.c && \
$CC -o getlinuxoffsets.tmp getlinuxoffsets1.c getlinuxoffsets2.o && \
./getlinuxoffsets.tmp && \
rm -f getlinuxoffsets.tmp getlinuxoffsets1.o getlinuxoffsets2.o
--------------------------------------------------
------- cut here: getlinuxoffsets1.c -------------
/* Copyright 2007 VMware, Inc.  All rights reserved. */
#include <stdio.h>
extern unsigned offsets[];
extern unsigned offsets_cnt;
int
main()
{
   unsigned i;
   for (i = 0; i < offsets_cnt; i++) {
      printf("%#x%c", offsets[i], (i == offsets_cnt - 1) ? '\n' : ',');
   }
   return 0;
}
--------------------------------------------------
------- cut here: getlinuxoffsets2.c -------------
/* Copyright 2007 VMware, Inc.  All rights reserved. */
#define __KERNEL__              1
#define MODULE                  1
#include <linux/version.h>
#include <linux/autoconf.h>
#include <linux/types.h>
#ifndef KBUILD_BASENAME
#define KBUILD_BASENAME "debugstub"
#endif
#include <linux/sched.h>
#define OFFS(_st, _fld) ((unsigned)&((struct _st *)0)->_fld)
#define NELEM(_arr) (sizeof(_arr) / sizeof(_arr[0]))
unsigned offsets[] = {
   LINUX_VERSION_CODE,
   OFFS(task_struct, mm),
#if LINUX_VERSION_CODE < KERNEL_VERSION(2,4,21)
   OFFS(task_struct, next_task),
   0,
#else
   0,
   OFFS(task_struct, tasks),
#endif
   OFFS(task_struct, comm),
   OFFS(task_struct, pid),
   OFFS(task_struct, thread),
   OFFS(mm_struct, pgd),
#if CONFIG_X86_64
   OFFS(thread_struct, rsp0),
#else
   OFFS(thread_struct, esp0),
#endif
   OFFS(thread_struct, fs),
   THREAD_SIZE,
#if LINUX_VERSION_CODE < KERNEL_VERSION(2,6,17)
   0,
   0,
#else
   OFFS(task_struct, group_leader),
   OFFS(task_struct, thread_group),
#endif
   sizeof ((struct task_struct *)0)->comm,
};
unsigned offsets_cnt = NELEM(offsets);
--------------------------------------------------
Invoke the getlinuxoffsets script as follows (provide the path to the kernel source tree if it is not /usr/src/linux):
% chmod u+x getlinuxoffsets
% ./getlinuxoffsets
0x20609,0xc0,0,0x90,0x422,0xf4,0x450,0x38,0,0x18,0x2000,0,0,0x10
Monday, September 24, 2007
Application debugging with Record/Replay
My previous article explained how to use Replay debugger with the kernel. The key benefit of Replay is that you get 100% reproducibility of bugs with low overhead, and can analyze the recording using existing debuggers.
You can debug Linux processes running in the Virtual Machine as well. The approach is similar. First, you need to set up a replayable Virtual Machine. The easiest way is to convert existing Virtual Appliance. Here is how to do it in four steps:
Download VMware Workstation 6.0.1. Free evaluation version is here. The speed of recording and replaying is improved considerably in this release, especially with Intel Core 2 CPUs. Also, a few bugs here and there were taken care of.
Download Ubuntu 7.04 Virtual Appliance. (If you use different distro, check out this).
Unzip the appliance and edit the Ubuntu-7.04-desktop-i386.vmx. Add the following lines (they enable record/replay, add toolbar buttons to control the recording and enable remote debugging):
Delete these lines (LSILogic and CD-ROM are not supported with Replay):
scsi0.virtualDev = "lsilogic"
ide1:0.startConnected = "TRUE"
... and add this line:
ide1:0.startConnected = "FALSE"
Power on the VM. It will ask you if you copied the VM - tell that you did. It will ask if you want to convert the SCSI to BusLogic type, click "yes".
Congratulations! You virtual machine is ready. For extra convenience, you may want to start /usr/bin/vmware-toolbox in a VM. This will automatically grab and release mouse when you enter or leave the VM.
The process of debugging is iterative. First you copy your application and tests inside the virtual machine, then you run the test scenario in recording mode until you get a crash. Once you've got a crash recorded, you can replay it as many times as you want, and inspect your application with debugger running on the Host. Let me go through these steps in details.
Copying the application and tests is easy. The appliance has networking enabled, so use you favorite network protocol: scp, ftp, rsync, etc. You need to make sure that you have same copy of the application running in the VM, and being passed to the debugger on the Host.
The VM has three new buttons on the Toolbar now: Record, Replay and Stop.
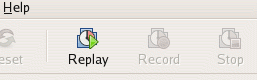
You can press Record, start the test inside the virtual machine and when it is done you can press Stop. This will record the execution of the test.
When you press Replay, the last recording is going to be replayed. If you want to replay some other recording, use Snapshot Manager to chose and replay it. You can also use Snapshot Manager to delete the recordings that you do not need anymore.

While you are replaying an application you can attach the gdb running on the Host to a virtual machine. Launch gdb on the Host machine. Assuming that your test application is MyApp:
% gdb MyApp
If you run gdb on the same Host, this line will attach gdb to the VM:
(gdb) target remote localhost:8832
By default our debugger is in system mode, that is, it doesn't know anything about processes in the virtual machine. To switch to process mode, you need to tell the debugger a little about the offsets of different kernel data structures. Here is how you can do it for Ubuntu 7.04:
(gdb) monitor linuxoffsets 0x20614,0x80,0,0x68,0x194,0xa4,0x1b0,\
0x24,0x18,0x28,0x2000,0xc4,0xec,0x10
Different kernel versions require different line. I will post instructions on how compute it in next article. When debugger is in process mode, you can use "info threads" command to get a list of all processes:
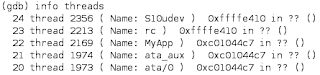
If you do not see your process in the listing, then it either hasn't started yet, or exited already. If it didn't start, you can just issue "continue" and then "^C" a little later. For short-living processes, you may want to add "sleep(5)" in the beginning of "main()" to simplify attaching.
To attach to the process you are interested in, you can use "thread" commands. The argument of the command is the first number in the "info threads" output corresponding to your process. For example, to attach to MyApp in the above listing you should issue this:
(gdb) thread 22
Once attached, you can inspect memory, insert breakpoints, step over instructions, etc. When you are done, you can either issue "quit" in the debugger to shut down Virtual Machine and debugger, or issue "detach" to let the Virtual Machine continue running without debugger. Of course, you can attach the debugger again anytime.
It is convenient to combine all gdb steps into a macro, e.g.:
--- cut here: attach.gdb ---
target remote localhost:8832
monitor linuxoffsets 0x20614,0x80,0,0x68,0x194,0xa4,0x1b0,\
0x24,0x18,0x28,0x2000,0xc4,0xec,0x10
info threads
--- cut here ---
Then you can attach gdb and get a list of processes with a single line:
% gdb --command=attach.gdb MyApp
The Replay feature remains experimental in the VMware Workstation 6.0.1. If you have a question or suggestion, or if you discovered a bug, please post here.The engineers working on Replay are checking the forum and will be happy to talk to you.
This note explained how to use replay debugging with processes running inside Ubuntu 7.04 Virtual Appliance. I will describe how to use it with different Linux kernels next.
You can debug Linux processes running in the Virtual Machine as well. The approach is similar. First, you need to set up a replayable Virtual Machine. The easiest way is to convert existing Virtual Appliance. Here is how to do it in four steps:
Download VMware Workstation 6.0.1. Free evaluation version is here. The speed of recording and replaying is improved considerably in this release, especially with Intel Core 2 CPUs. Also, a few bugs here and there were taken care of.
Download Ubuntu 7.04 Virtual Appliance. (If you use different distro, check out this).
Unzip the appliance and edit the Ubuntu-7.04-desktop-i386.vmx. Add the following lines (they enable record/replay, add toolbar buttons to control the recording and enable remote debugging):
replay.logging = "TRUE"
pref.view.toolbars.vplay = "TRUE"
pref.view.toolbars.view = "FALSE"
debugStub.listen.guest32 = "TRUE"
debugStub.listen.guest32.remote = "TRUE"
pref.view.toolbars.vplay = "TRUE"
pref.view.toolbars.view = "FALSE"
debugStub.listen.guest32 = "TRUE"
debugStub.listen.guest32.remote = "TRUE"
Delete these lines (LSILogic and CD-ROM are not supported with Replay):
scsi0.virtualDev = "lsilogic"
ide1:0.startConnected = "TRUE"
... and add this line:
ide1:0.startConnected = "FALSE"
Power on the VM. It will ask you if you copied the VM - tell that you did. It will ask if you want to convert the SCSI to BusLogic type, click "yes".
Congratulations! You virtual machine is ready. For extra convenience, you may want to start /usr/bin/vmware-toolbox in a VM. This will automatically grab and release mouse when you enter or leave the VM.
The process of debugging is iterative. First you copy your application and tests inside the virtual machine, then you run the test scenario in recording mode until you get a crash. Once you've got a crash recorded, you can replay it as many times as you want, and inspect your application with debugger running on the Host. Let me go through these steps in details.
Copying the application and tests is easy. The appliance has networking enabled, so use you favorite network protocol: scp, ftp, rsync, etc. You need to make sure that you have same copy of the application running in the VM, and being passed to the debugger on the Host.
The VM has three new buttons on the Toolbar now: Record, Replay and Stop.

You can press Record, start the test inside the virtual machine and when it is done you can press Stop. This will record the execution of the test.

If you run gdb on the same Host, this line will attach gdb to the VM:
(gdb) target remote localhost:8832
By default our debugger is in system mode, that is, it doesn't know anything about processes in the virtual machine. To switch to process mode, you need to tell the debugger a little about the offsets of different kernel data structures. Here is how you can do it for Ubuntu 7.04:
(gdb) monitor linuxoffsets 0x20614,0x80,0,0x68,0x194,0xa4,0x1b0,\

(gdb) thread 22
Once attached, you can inspect memory, insert breakpoints, step over instructions, etc. When you are done, you can either issue "quit" in the debugger to shut down Virtual Machine and debugger, or issue "detach" to let the Virtual Machine continue running without debugger. Of course, you can attach the debugger again anytime.
It is convenient to combine all gdb steps into a macro, e.g.:
--- cut here: attach.gdb ---
Then you can attach gdb and get a list of processes with a single line:
% gdb --command=attach.gdb MyApp
The Replay feature remains experimental in the VMware Workstation 6.0.1. If you have a question or suggestion, or if you discovered a bug, please post here.
This note explained how to use replay debugging with processes running inside Ubuntu 7.04 Virtual Appliance. I will describe how to use it with different Linux kernels next.
Friday, April 20, 2007
Workstation 6.0 and the death of irreproducible bugs
Have you ever dealt with an irreproducible bug? The one that hits once in a blue moon and hides when you try to use any debugging tools? Well, since we also get them in VMware, we decided to do something about it. So we combined the gdb support in Workstation 6.0 with the Record/Replay. The result allows you to record the execution triggering the bug and then debug it with gdb as many times as you want, each time getting 100% reproducibility.
You can use this feature to debug Linux kernel or Linux processes. I'll start with the kernel as it requires less preparation. Download latest build of Workstation here (or get evaluation copy). Add a line enabling debugger connection as described in previous post:
debugStub.listen.guest32=1
Prepare VM for recording (VM > Settings > Options > Snapshot/Replay > Enable execution record and replay). Record VM execution while reproducing a bug. Replay the recording, attach gdb and follow the execution of VM. All the usual gdb features work in Replay mode - breakpoints, ^C, single step, memory inspection, debugging with symbols, etc. One difference is that to preserve determinism debugger won't allow memory or register modifications.
When reproducing a bug you may want to skip the recording up to the point just before things go wrong. We added a few features to help with that. First, we made replay fast by making time run faster. You can increase and decrease the pace of time by using left and right arrows during replay or using this configuration file line (bigger argument - slower replay):
replay.halt_delay = 1000
We also added a command to indicate a recording position:
(gdb) monitor position
and a command that activates a breakpoint at a given position:
(gdb) monitor stopat 10000
For example, when debugging Linux driver issues, I set a breakpoint in die() and similar functions, replay it once and use "monitor position". Then I replay again and use "monitor stopat" at position a few thousand units before die() and step from there.
You can also make debugger jump forward by several units using incremental form of stopat:
(gdb) monitor stopat +100
(gdb) continue
The caveats. Some devices are not supported; no support for 64-bit or SMP. Recording slows down virtual machine (a little) and requires disk space, but not by that much. This feature is experimental but we'll be happy to hear from you if you need help.
Next, I am going to post about application debugging. Debugger lives outside of the virtual machine, so to debug the processes it needs some information about the kernel you are using.
Tuesday, April 17, 2007
Debugging Linux kernels with Workstation 6.0
We just quietly added an exciting feature to Workstation 6.0. I believe it will make WS6 a great tool for Linux kernel development. You can now use gdb on your host to debug the Linux kernel running inside the VM. No kdb, no recompiling and no need for second machine. All you need is a single line in VM's configuration file.
To use the new feature, grab the latest build of Workstation here, or free 30-day evaluation here. Put this line into configuration file of your Linux VM:
debugStub.listen.guest32=1
Now whenever you run the virtual machine, you'll see the following in the vmware.log file (debug builds will also print this message to Host console):
VMware Workstation is listening for debug connection on port 8832.
Run gdb on the Host, reference it to the kernel with symbols and attach to the virtual machine:
% gdb
(gdb) file vmlinux-2.4.21-27.EL.debug
(gdb) target remote localhost:8832
That's it. The VM is blocked now, so you can "continue" it and "^C" back to gdb. Breakpoints, single step, memory inspection - all this works as usual. If you have SMP VM, then each VCPU is mapped on a thread, so use "info threads" and "thread NN" to switch between them.
Debugging the 64-bit kernel works in the same way, except you need to use a different option:
debugStub.listen.guest64=1
and connect to port 8864. Since gdb starts in 32-bit mode by default, you may also need to switch it to i386:x64-64 before connecting:
(gdb) set architecture i386:x86-64
(gdb) target remote localhost:8864
The kernels with symbols are sadly lacking on most distributions, but if you use RHEL then this website may help (look for kernel-debuginfo rpm):
http://people.redhat.com/duffy/debuginfo/index-js.html
The gdb support in WS6 is experimental, so there may be rough edges here and there. Please post on community forums if something doesn't work right or if you have a suggestion:
http://communities.vmware.com/community/vmtn/general/guestdebugmonitor
There are more debugging specific features in WS6 (for example, you can use gdb hand-in-hand with Record/Replay!). I will describe them shortly.
Updated 4/20/07: added explanation of 64-bit support.
Updated 5/14/07: release build prints "waiting for gdb" message into vmware.log only.
Updated 7/24/07: pointers to new build and discussion forum.
Subscribe to:
Posts (Atom)